Put Your Work on GitHub
Hand in an exercise as a link, with no Git needed, by making a free GitHub account and a public repository and uploading your files in the browser, everything but node_modules.
Novice · Web Development · HTML · Updated
After this lesson you can
- Put an exercise's files in a public GitHub repository by uploading them in the browser, and hand in its address
- Choose which of an exercise's files to upload, leaving out node_modules, and explain why it stays behind
Key takeaways
- GitHub keeps project files online. Each project is a repository (repo), and anyone with a public repo's address can open it and read its files.
- You can make a repository and upload files in the browser, with New repository, then Add file and Upload files. No Git or other software is needed.
- Leave node_modules out. It holds the tools npm install downloaded, not your work, it's far too many files to upload, and npm install makes it again.
- A commit is a saved snapshot of your files with a short note saying what changed. Upload again and commit, and the repo keeps both versions.
- To hand in an exercise, paste your public repo's address, such as https://github.com/your-username/exercise-html-your-first-web-page, into Submit your exercise.
You've built a page, and every check on your computer says ✔. Now someone else needs to see it: this course, to mark the exercise complete; a teacher who says "submit a link to your repo"; someone hiring, who wants to see what you can make. Your laptop can't be the answer, because nobody else can open it. This lesson sets up the free account you'll hand in every exercise with, and walks through handing one in, screen by screen. There's nothing to install: it all happens in your browser.
What it costs: nothing. A GitHub account and public repositories are free. Nothing in this lesson asks for a payment card.
Why not email it?
The first thing most people try is attaching the folder to an email or a message. It falls apart quickly:
- It's too big, or it's blocked. Once you've run an exercise's checks, its folder holds thousands of files (you'll see why below). Email services refuse attachments that size, and many refuse web files altogether.
- Every change means sending it again, and soon nobody knows which copy is the latest.
- Nothing can open it. A file in someone's inbox has no address that a website, or a teacher's browser, can visit.
A shared cloud-drive folder fixes the size, but its files are private until you change its settings, and it keeps no clear record of what changed and when. What you want is a public shelf for project files: one with an address anyone can open, that keeps every version. That's what GitHub is.
GitHub and repositories
GitHub is a website where people keep their projects' files online, from homework to the code behind famous apps. Each project gets its own repository (people say repo): a folder of files on GitHub that also remembers every earlier version of them. Think of a binder on a library shelf: one binder per project, a label on the spine, and every page you've added kept in order.
A public repository is one anyone can open, without an account. That's what you want here: the course, your teacher or a friend follows the link and sees your files. Its address is GitHub's, then your username, then the repo's name:
https://github.com/your-username/game-night
Step 1: a free account
- Go to
github.comand choose Sign up. - Enter your email address, a password and a username. GitHub emails you a code, to check the address is yours.
- If GitHub asks you to turn on two-factor authentication (a second check, such as a code from an app on your phone, when you sign in somewhere new), follow its steps. It keeps your account safe.
Pick the username with care. It's public and it's part of every repo's address, so choose one you'd be happy to put on a resume. It doesn't have to be your full name.
Step 2: a repository for your work
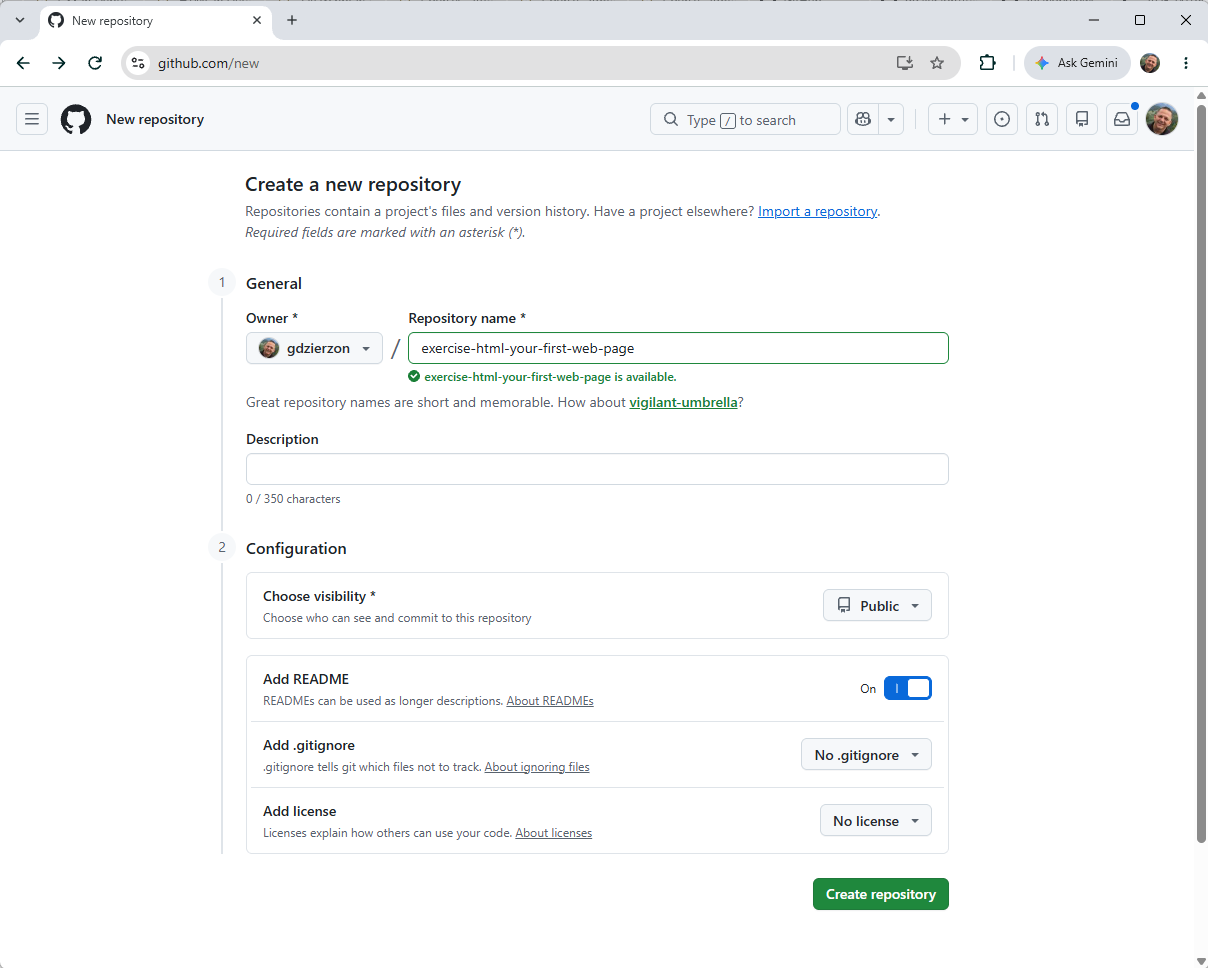
- Signed in, choose the + in the top-right corner, then New repository.
- Type a name in lowercase with hyphens, the way you name web files in Files and Folders for a Website. For an exercise, the exercise's own name works well, such as
exercise-html-your-first-web-page. - Choose Public.
- Turn Add README on (some screens call it Add a README file). A README is a page of notes about the project. It gives the new repository its first file, so the upload button appears.
- Choose Create repository.
Step 3: upload your files
- On your new repository's page, choose Add file, then Upload files.
- On your computer, open your project folder and select everything inside it (Ctrl+A on Windows, Cmd+A on a Mac). If there's a
node_modulesfolder, Ctrl+click it (Cmd+click on a Mac) to take it out of the selection. The next section says why. - Drag the selection onto the upload area. Drag what's inside the folder, not the folder itself, so
index.htmllands at the top of your repo and not one folder down. - Wait until every file is listed. Under Commit changes, type a short note about what you're adding, such as My game night page, and choose Commit changes.
A commit is a saved snapshot of the files, with a note saying what changed. Your repo's page now lists your files, with the commit's note beside them. A folder you uploaded, such as test or images, shows as a folder. Every exercise folder has its own README.md, and it replaces the one GitHub made.
What stays behind: node_modules
Every exercise in this course comes with checks, and before you run them the first time, npm install downloads the tools they need into a folder named node_modules (read "node modules"). Look inside one and you'll find more than two thousand files.
None of them is your work. They're the same tools anyone gets by running npm install in the folder, because package.json lists exactly which ones to fetch. Uploading them wouldn't work anyway: GitHub's upload takes at most 100 files at a time. So node_modules stays on your computer, and package.json goes up, so anyone can make the folder again with npm install.
Here's the folder of a finished Exercise: Your First Web Page, and what goes up:
exercise-html-your-first-web-page-main/
├── .gitignore          upload
├── README.md           upload
├── index.html          upload: your page
├── node_modules/       leave out
├── package-lock.json   upload
├── package.json        upload
├── skeleton.html       upload
└── test/               upload
package-lock.json is a list npm install wrote of the exact versions it downloaded. It's small, so it goes up too.
The .gitignore file in each exercise is a note for Git, a program many developers use to send their files to GitHub from the terminal. It lists node_modules, so Git leaves the folder out by itself. Uploading in the browser doesn't read that note, which is why you leave node_modules out yourself. (On a Mac, Finder hides files whose names start with a dot, so .gitignore stays behind. That's fine: the exercise doesn't need it.)
Hand in an exercise
Every exercise lesson ends with Submit your exercise. When your work is done:
- Make a public repository for it (Step 2), and upload everything in the exercise's folder except
node_modules(Step 3). - Copy the repo's address from your browser's address bar, such as
https://github.com/your-username/exercise-html-your-first-web-page. - Paste it into Submit your exercise on the lesson page.
The site checks that the repo is public and holds your own commits, and then the lesson is complete. Changed something afterwards? Upload the changed files again (a file with the same name replaces the old one), commit, and submit again: your latest submission is the one that counts.
What public means
Anyone can open a public repository and read every file in it, earlier versions included. So before you upload, leave out anything private: your home address, your phone number, passwords, and photos of people who haven't said yes. An exercise's files have none of that, and that's how it should stay.
Try it. Make your GitHub account now, then a public repository named practice-upload. Upload hello.html from Setup: VS Code, a Browser and Node.js, commit it, and open the repo's address in a private window (Ctrl+Shift+N in Chrome and Edge, Cmd+Shift+N on a Mac): that's what anyone else sees. You'll do it for real at the end of Exercise: Your First Web Page.
Later in this module, Put Your Site Online for Free takes the next step: the same kind of repository becomes a website with an address of its own, with GitHub Pages.
Check yourself
2 questions to try on the lesson page.
So what
A link to a repo is how developers share their work, with a class, a team or someone hiring. From here on, every exercise you finish is one upload away from being handed in.
Key terms
- GitHub
- Repository
- Commit
- node_modules