Java Maven Project
Create a Maven project in IntelliJ IDEA, find your way around its folders, and write and run your first Java class.
Novice · Java · Updated
A Java project is a folder with one or more .java files that together make one program. A Maven project adds a pom.xml file that tells Maven how to build and run it.
Let's create your first Maven project in IntelliJ IDEA. You'll use it for the practice in the next few lessons.
Step 1: Create a Maven Project
- Open IntelliJ IDEA and click New Project.
- Select Java on the left.
- Set Name to
java-basics. - Set Build system to Maven.
- Choose your JDK in the JDK list.
- Leave Add sample code checked.
- Open Advanced Settings and set GroupId to
com.askcodey. - Click Create.
IntelliJ creates the project folder with a pom.xml file, the main file of any Maven project: it holds everything Maven needs to build and run your code.
Structure Example:
java-basics/
  ├── src/
  ├── pom.xml
To open the project again later, choose Open on the Welcome screen and select the folder that contains pom.xml. IntelliJ recognizes it as a Maven project from the pom.xml file.
Step 2: Understand the Maven Folder and File Structure
Once your project is open, you'll see a specific structure within IntelliJ that follows Maven's standard layout. Here’s a breakdown of the common folders and files you’ll encounter:
src/main/java: This is where your main Java source code goes. For instance, if you are working on a package called com.askcodey, you’d place your code here.
  src/
  └── main/
      └── java/
          └── com/
              └── askcodey/
                  └── Application.java  // Your Java class files
src/test/java: This folder is for your test Java source code.
  src/
  └── test/
      └── java/
          └── com/
              └── askcodey/
                  └── ApplicationTest.java  // Your test class files
Step 3: A Simple Java Class Example
To give you a concrete example, let's create a simple Java class in com.askcodey.
Right click on the com.askcodey package and create a new Java class.
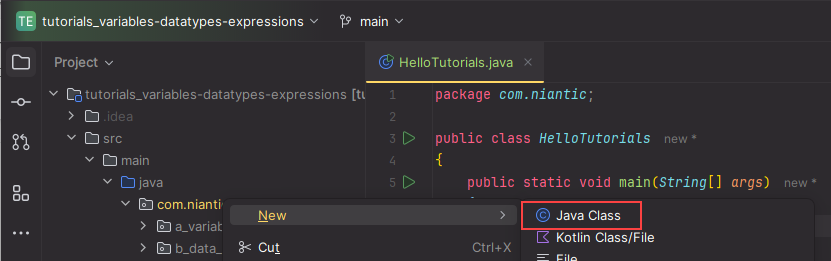
Name the class HelloTutorials and add the following code:
package com.askcodey;

public class HelloTutorials
{
    public static void main(String[] args) {
        System.out.println("Hello Tutorials");
    }
}
Step 4: Running Your Java Class
Click the green Run arrow beside main in the HelloTutorials class.
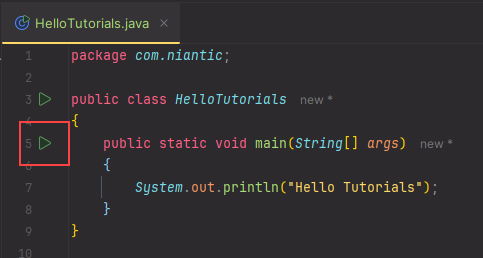
You should see Hello Tutorials printed in the console window at the bottom.
Do it: print the pizzeria's welcome sign
Build-It Pizzeria wants the computer at its counter to greet customers when the program starts.
The box below holds Main.java, a shorter form of the class you wrote above. Since Java 25, a small program can be a void main() method with nothing around it: no public class line and no public static. main() still runs when the program starts. Right now it prints Hello Tutorials.
Your program should print exactly these three lines, in this order:
Welcome to Build-It Pizzeria!
Build your own pizza.
Open every day, 11 AM to 10 PM.
Your job: change main() so it prints the three lines above.
- Print each line with its own instruction, in the order shown.
- Copy each line exactly: the same capital letters, spaces and punctuation.
- Print nothing else, so the
Hello Tutorialsline goes.
Practiced live on the lesson page: write the Java right there and check it.