# The CSS You Need for JavaScript
Read a CSS rule's selector, properties and values, pick elements by tag name, class, id or what they're inside, and see how a class added or removed by JavaScript changes the way an element looks.
Novice · JavaScript · CSS · Updated November 1, 2026
## After this lesson you can
- Read a CSS rule and name its selector, properties and values
- Write a CSS selector that picks elements by tag name, by class with a dot, by id with a hash, or inside another element
- Explain how adding or removing a class changes the way an element looks
## Key takeaways
- A CSS rule is a selector, then curly braces holding declarations, each a property and a value: `h1 { color: midnightblue; }`.
- Selectors pick elements: `li` by tag name, `.sold-out` by class (a dot), `#tour-list` by id (a hash), and `#tour-list li` the elements inside another (a space).
- The dot and the hash belong to CSS selectors. In the HTML, the attribute holds the name alone, as in class="sold-out".
- JavaScript changes how an element looks by adding or removing a class. The CSS says what that class looks like, so the look stays in one place.
On The Midnight Owls' fan page, there's a **Show more** button under last night's setlist. Click it, and three more songs appear. JavaScript didn't write those songs onto the page: they were there all along, hidden by a line of CSS, and the click took away the one word that hid them. Menus that open, tabs that switch, a dark mode, a sold-out show that turns gray: most of what moves on a web page works this way. **CSS** says how things look, and JavaScript switches the looks on and off.
There's a second reason you need CSS. When JavaScript looks for something on a page, it describes what it wants in CSS's language, with a **selector**. You'll write selectors in almost every lesson from here on.
You won't write stylesheets in this course: every page comes with its CSS ready-made. You'll read them, and you'll write selectors all the time. If you'd like to style pages of your own one day, the CSS in Depth course teaches CSS from the start.
## A rule: who, and how they look
Before a show, a band hands the lighting crew a note: *Drummer: red light, dim. Singer: white spotlight.* Each line says **who**, then **how**. CSS works the same way. Each instruction is a **rule**, and it starts by saying which elements it's for:
```css
h1 {
color: midnightblue;
font-size: 48px;
}
```
- **`h1`** is the **selector**: who the rule is for. Here, every `
` on the page.
- The curly braces, **`{`** and **`}`**, hold what to do to them. Read them aloud as "open curly brace" and "close curly brace".
- Each line inside is a **declaration**: a **property** (what to change, `color`), a colon, a **value** (what to change it to, `midnightblue`), and a semicolon to end it. Read `color: midnightblue;` as "color, colon, midnightblue, semicolon".
This rule makes the band's name dark blue and 48 pixels tall. A rule can hold as many declarations as it needs, one per line.
## Where the CSS lives
Most CSS sits in its own file, a **stylesheet**, and the page loads it with a `` element in its ``. You saw the line in the whole page of *The HTML You Need for JavaScript*:
```html
```
One stylesheet can style a whole website, so every page looks like it belongs to the same band.
A look can also be written straight onto one element, with the `style` attribute: `
`. That's called an **inline style**. It holds declarations only, with no selector, because it's already on the element it's for. JavaScript can set inline styles too, and *Common DOM Interactions* shows how. Most of the time, though, the look belongs in the stylesheet, for a reason you'll see at the end of this lesson.
## Four ways to pick elements
These four selectors cover almost everything in this course:
| Selector | Read it as | What it picks |
|---|---|---|
| `li` | "l-i" | Every `
` on the page: by its **tag name** |
| `.sold-out` | "dot sold-out" | Every element with the class `sold-out`: a **class selector** |
| `#tour-list` | "hash tour-list" | The one element with the id `tour-list`: an **id selector** |
| `#tour-list li` | "l-i inside tour-list" | Every `
` anywhere inside `#tour-list`: a **descendant selector** |
The `#` is called a hash (you'll also hear "pound sign"). In the descendant selector, the space between the two parts is what means "inside". CSS's own name for that space is the *descendant combinator*. Here are all four as rules from the fan page's stylesheet:
```css
li {
margin-bottom: 8px;
}
.sold-out {
color: gray;
}
#tour-list {
padding: 0;
}
#tour-list li {
background-color: white;
}
```
Remember from the last lesson: the dot and the hash are only in the selector. The HTML says `class="sold-out"` and `id="tour-list"`.
## Reading longer selectors
Selectors can chain more steps together. Read them from right to left, and they turn into plain sentences:
```css
nav a {
color: gold;
}
#setlist .extra-song {
font-style: italic;
}
li.sold-out {
color: gray;
}
```
- `nav a`: "every link inside the nav". The menu's links turn gold, and other links on the page don't.
- `#setlist .extra-song`: "every element with the class `extra-song` inside the setlist".
- `li.sold-out`, with **no space**: "every `
` that has the class `sold-out`". No space means both things are true of the *same* element. With a space, `li .sold-out` would mean something different: an element with the class `sold-out` *inside* an `
`.
JavaScript uses exactly these selectors to find elements. For example, `document.querySelectorAll("#tour-list li")` finds every show in the tour list, and *Locating DOM elements* teaches it.
**Try it.** Open your `midnight-owls` page from the last lesson in the browser, right-click it and choose **Inspect**. In the Elements panel, press **Ctrl+F** (**Cmd+F** on macOS) and type a selector into the search box: `#tour-list li`, then `.sold-out`, then `li.show`. DevTools highlights each match and says how many it found, such as *1 of 2*. Try `.tour-list`: it finds nothing, because `tour-list` is an id, not a class.
## A class that changes the look
Here's the pattern JavaScript uses more than any other. The stylesheet describes a look for a class:
```css
.hidden {
display: none;
}
```
`display: none` means "don't show this at all". On the fan page, the last three songs of the setlist start with that class, next to their own:
```html
Owl Eyes
```
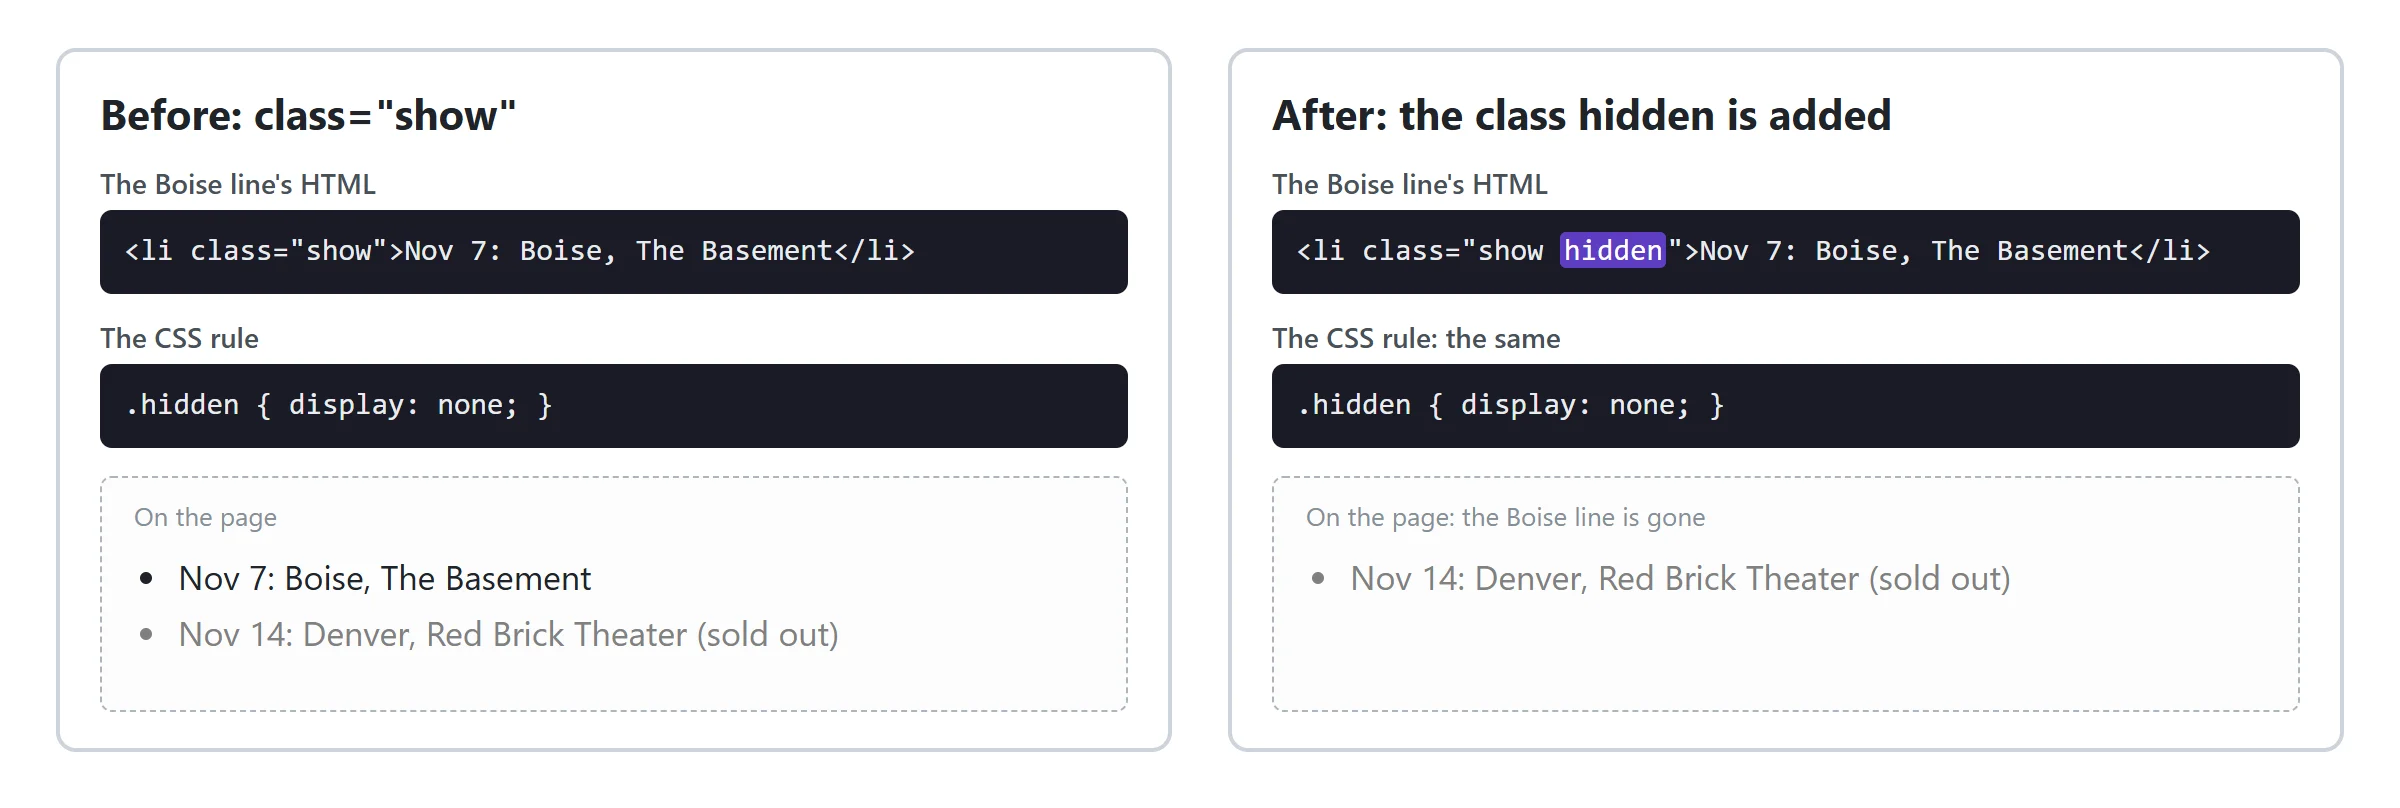
When someone clicks **Show more**, JavaScript takes the class `hidden` off each of those songs. Now the element is `
`, the `.hidden` rule doesn't match it any more, and the song appears. Click again, the class goes back on, and the song disappears. The line that does it is `song.classList.toggle("hidden")`, and you'll write lines like it yourself in *Common DOM Interactions*.
The sold-out shows work the same way: JavaScript adds the class `sold-out` to a show, and the `.sold-out` rule grays it out.
Why a class, and not an inline style set from JavaScript? Because the look stays in one place, the stylesheet. JavaScript only says what state an element is in, *hidden*, *sold out*, *open*, and if the band decides sold-out shows should be purple instead of gray, someone changes one line of CSS and never touches the JavaScript. The fan page also writes *(sold out)* in words, so a person who can't tell gray from black still knows.
**Try it.** Add this inside the `` of your `midnight-owls` page, under the ``, and save. A `<style>` element holds CSS inside the page itself, which is handy for a quick test:
```html
<style>
.sold-out { color: gray; }
.hidden { display: none; }
</style>
```
The Denver show turns gray. Now, in the Elements panel, double-click the word `show` in the Boise line's `class="show"`, change it to `show hidden` and press **Enter**: the Boise show disappears. Change it back, and it returns. That's exactly what JavaScript does, one class at a time.
## Check yourself
2 questions to try on the lesson page.
## So what
CSS describes every look a page can have, and JavaScript decides which one each element wears, by adding and removing classes. The selectors you read here are also how your code will find every element it works with.
## Key terms
- [CSS rule](https://www.ask-codey.com/glossary/css-rule)
- [Selector](https://www.ask-codey.com/glossary/selector)
- [Property](https://www.ask-codey.com/glossary/property-css-2)
- [Class selector](https://www.ask-codey.com/glossary/class-selector)
- [ID selector](https://www.ask-codey.com/glossary/id-selector)
- [Descendant combinator](https://www.ask-codey.com/glossary/descendant-combinator)
## Cheat sheets
- [The CSS You Need for JavaScript](https://www.ask-codey.com/cheat-sheets/javascript-page-basics-the-css-you-need-cheat-sheet)
## Related
- [The HTML You Need for JavaScript](https://www.ask-codey.com/lessons/javascript-page-basics-the-html-you-need)
- [Locating DOM elements](https://www.ask-codey.com/lessons/introducing-the-dom-locating-dom-elements)
- [Common DOM Interactions](https://www.ask-codey.com/lessons/working-with-elements-common-dom-interactions)
Source: https://www.ask-codey.com/lessons/javascript-page-basics-the-css-you-need