The HTML You Need for JavaScript
Read a web page the way JavaScript sees it, as elements with tags, attributes and content nested inside each other, with an id or a class on the ones your code needs to find.
Novice · JavaScript · HTML · Updated
After this lesson you can
- Read a piece of HTML and name its tags, attributes and content, and which element is inside which
- Choose the HTML element for a part of a page, such as a heading, list, link, image, button or text box
- Tell when an element needs an id and when it needs a class
Key takeaways
- An element is a start tag, its content and an end tag:
<p>Tour dates</p>. A few elements, such as<img>and<input>, hold nothing and have no end tag. - An attribute adds a detail to a start tag, written name="value":
hrefsays where a link goes,srcwhich picture to show, andaltwhat the picture means. - An element inside another is its child, and the one around it is its parent. Close the inner element before the outer one.
- Give an element an id when your code needs to find that one element, and a class when several elements share a job or a look.
A fan opens The Midnight Owls' website and sees Nov 14: Denver, Red Brick Theater (sold out). Nobody typed that line into the page by hand. A few lines of JavaScript found the tour list on the page, made a new line for each show, and marked the sold-out ones. Every time JavaScript changes a page, a list that grows, a message that appears, a button that changes its words, it's changing the page's HTML.
This course hands you every page you work on, ready-made, so you won't write whole pages. But you do need to read them, the way a band's stage crew reads the stage plan before they move a single amplifier: what's here, what's inside what, and what each thing is called. That's what this lesson teaches. If you'd like to build pages of your own from scratch one day, the HTML in Depth course teaches HTML from the start.
All through this chapter, the page is a fan page for The Midnight Owls, a made-up indie band: the band members, their tour dates, last night's setlist and a newsletter sign-up.
Labeled boxes: elements and tags
You met the idea in JavaScript on a Web Page: HTML works like the labels on moving boxes. Each piece of a page sits in a box, and the label says what kind of thing is inside.
Each box is an element. Its labels are tags, written between angle brackets, < and >:
<h1>The Midnight Owls</h1>
<p>Indie rock for people who stay up too late.</p>
<h1>is the start tag. Read it aloud as "angle bracket h-one". It opens the box:h1is the page's main heading.The Midnight Owlsis the element's content: what's in the box.</h1>is the end tag. It's the start tag with a slash after the first angle bracket, and it closes the box.
The start tag, the content and the end tag together make one element: the heading element. The second line is a paragraph element, <p>.
A few elements hold nothing, so they have no end tag. A picture, <img>, and a text box, <input>, are two you'll see often. They're called void elements.
Attributes: details written on the tag
A concert ticket has details printed on it: which door to use, which row, which seat. A start tag can carry details too, called attributes. Each one is a name, an equals sign, and a value in double quotes: name="value".
<a href="#tour">Tour dates</a>
<img src="images/owl-logo.svg" alt="The Midnight Owls logo: an owl's face under a crescent moon">
- The
<a>element is a link (ais short for anchor). Itshrefattribute says where the link goes.#tourmeans "the part of this page whose id istour". - The
<img>element shows a picture. Itssrcattribute (short for source) names the picture's file. - Its
altattribute is the picture's alternative text: words that say what the picture means. A screen reader, the program that reads a page aloud for someone who can't see it, reads thealttext, and the browser shows it if the picture can't load. Every picture needs one.
Attributes go only in the start tag, never in the end tag, and an element can have as many as it needs.
Boxes inside boxes: parents and children
A band's setlist is a numbered list of songs. In HTML, the list is one element, and each song is an element inside it:
<section id="setlist">
  <h2>Last night's setlist</h2>
  <ol>
    <li>Streetlight Serenade</li>
    <li>Coffee at 3 AM</li>
    <li>Paper Moon Parade</li>
  </ol>
</section>
Putting one element inside another is called nesting, and it comes with family words:
- An element directly inside another is its child. Each
<li>(a list item) is a child of the<ol>(an ordered list, one with numbers). - The element directly around it is its parent. The
<ol>is the parent of the three<li>elements, and the<section>is the parent of the<h2>and the<ol>. - Children of the same parent are siblings, like the three songs.
The inner box closes before the outer one: each </li> comes before </ol>, and </ol> before </section>. The spaces at the start of each line don't change the page. They're there so a person can see what's inside what at a glance.
This family tree matters to JavaScript. When the browser loads the page, it builds a tree from this nesting, and your code finds and changes elements by moving around that tree. Introducing the DOM: an overview shows the tree.
The elements JavaScript works with most
HTML has more than a hundred elements, and these are the ones you'll meet again and again in this course:
| Element | What it is | On the fan page |
|---|---|---|
<h1> to <h6> |
Headings, from the page's main title (<h1>) down to smaller ones |
The band's name; Tour dates |
<p> |
A paragraph of text | The tagline; 5 upcoming shows |
<ul>, <ol> and <li> |
A bulleted list, a numbered list, and one item in either | The tour dates; the setlist |
<a> |
A link | Tour dates in the menu |
<img> |
A picture (void: no end tag) | The owl logo |
<button> |
A button a person can click | Show more |
<form>, <label> and <input> |
A form, a label for a box, and a box to type in (void) | The newsletter sign-up |
<section> |
A part of the page about one thing, usually with its own heading | The band; the tour; the setlist |
<div> |
A box with no meaning of its own, for grouping things | A card around one show |
<span> |
A few words inside a line, marked so code or a style can find them | A band member's name |
<strong> |
Words that matter, shown in bold | Sold out! |
<header>, <nav>, <main> and <footer> |
The top of the page, its menu, its main content and its bottom | The page's four big parts |
Here are a few of them working together, in the band's line-up and the newsletter form:
<li class="member"><span class="member-name">Juno Reyes</span>, vocals and guitar</li>

<form id="newsletter-form">
  <label for="email">Email</label>
  <input id="email" type="email" placeholder="you@example.com">
  <button type="submit">Sign up</button>
</form>
The <span> marks only the name inside the line, so it can be shown in bold. The <label> names the box: its for attribute matches the <input>'s id, so a screen reader says "Email" when someone lands in the box. And type="email" tells the browser that the box is for an email address.
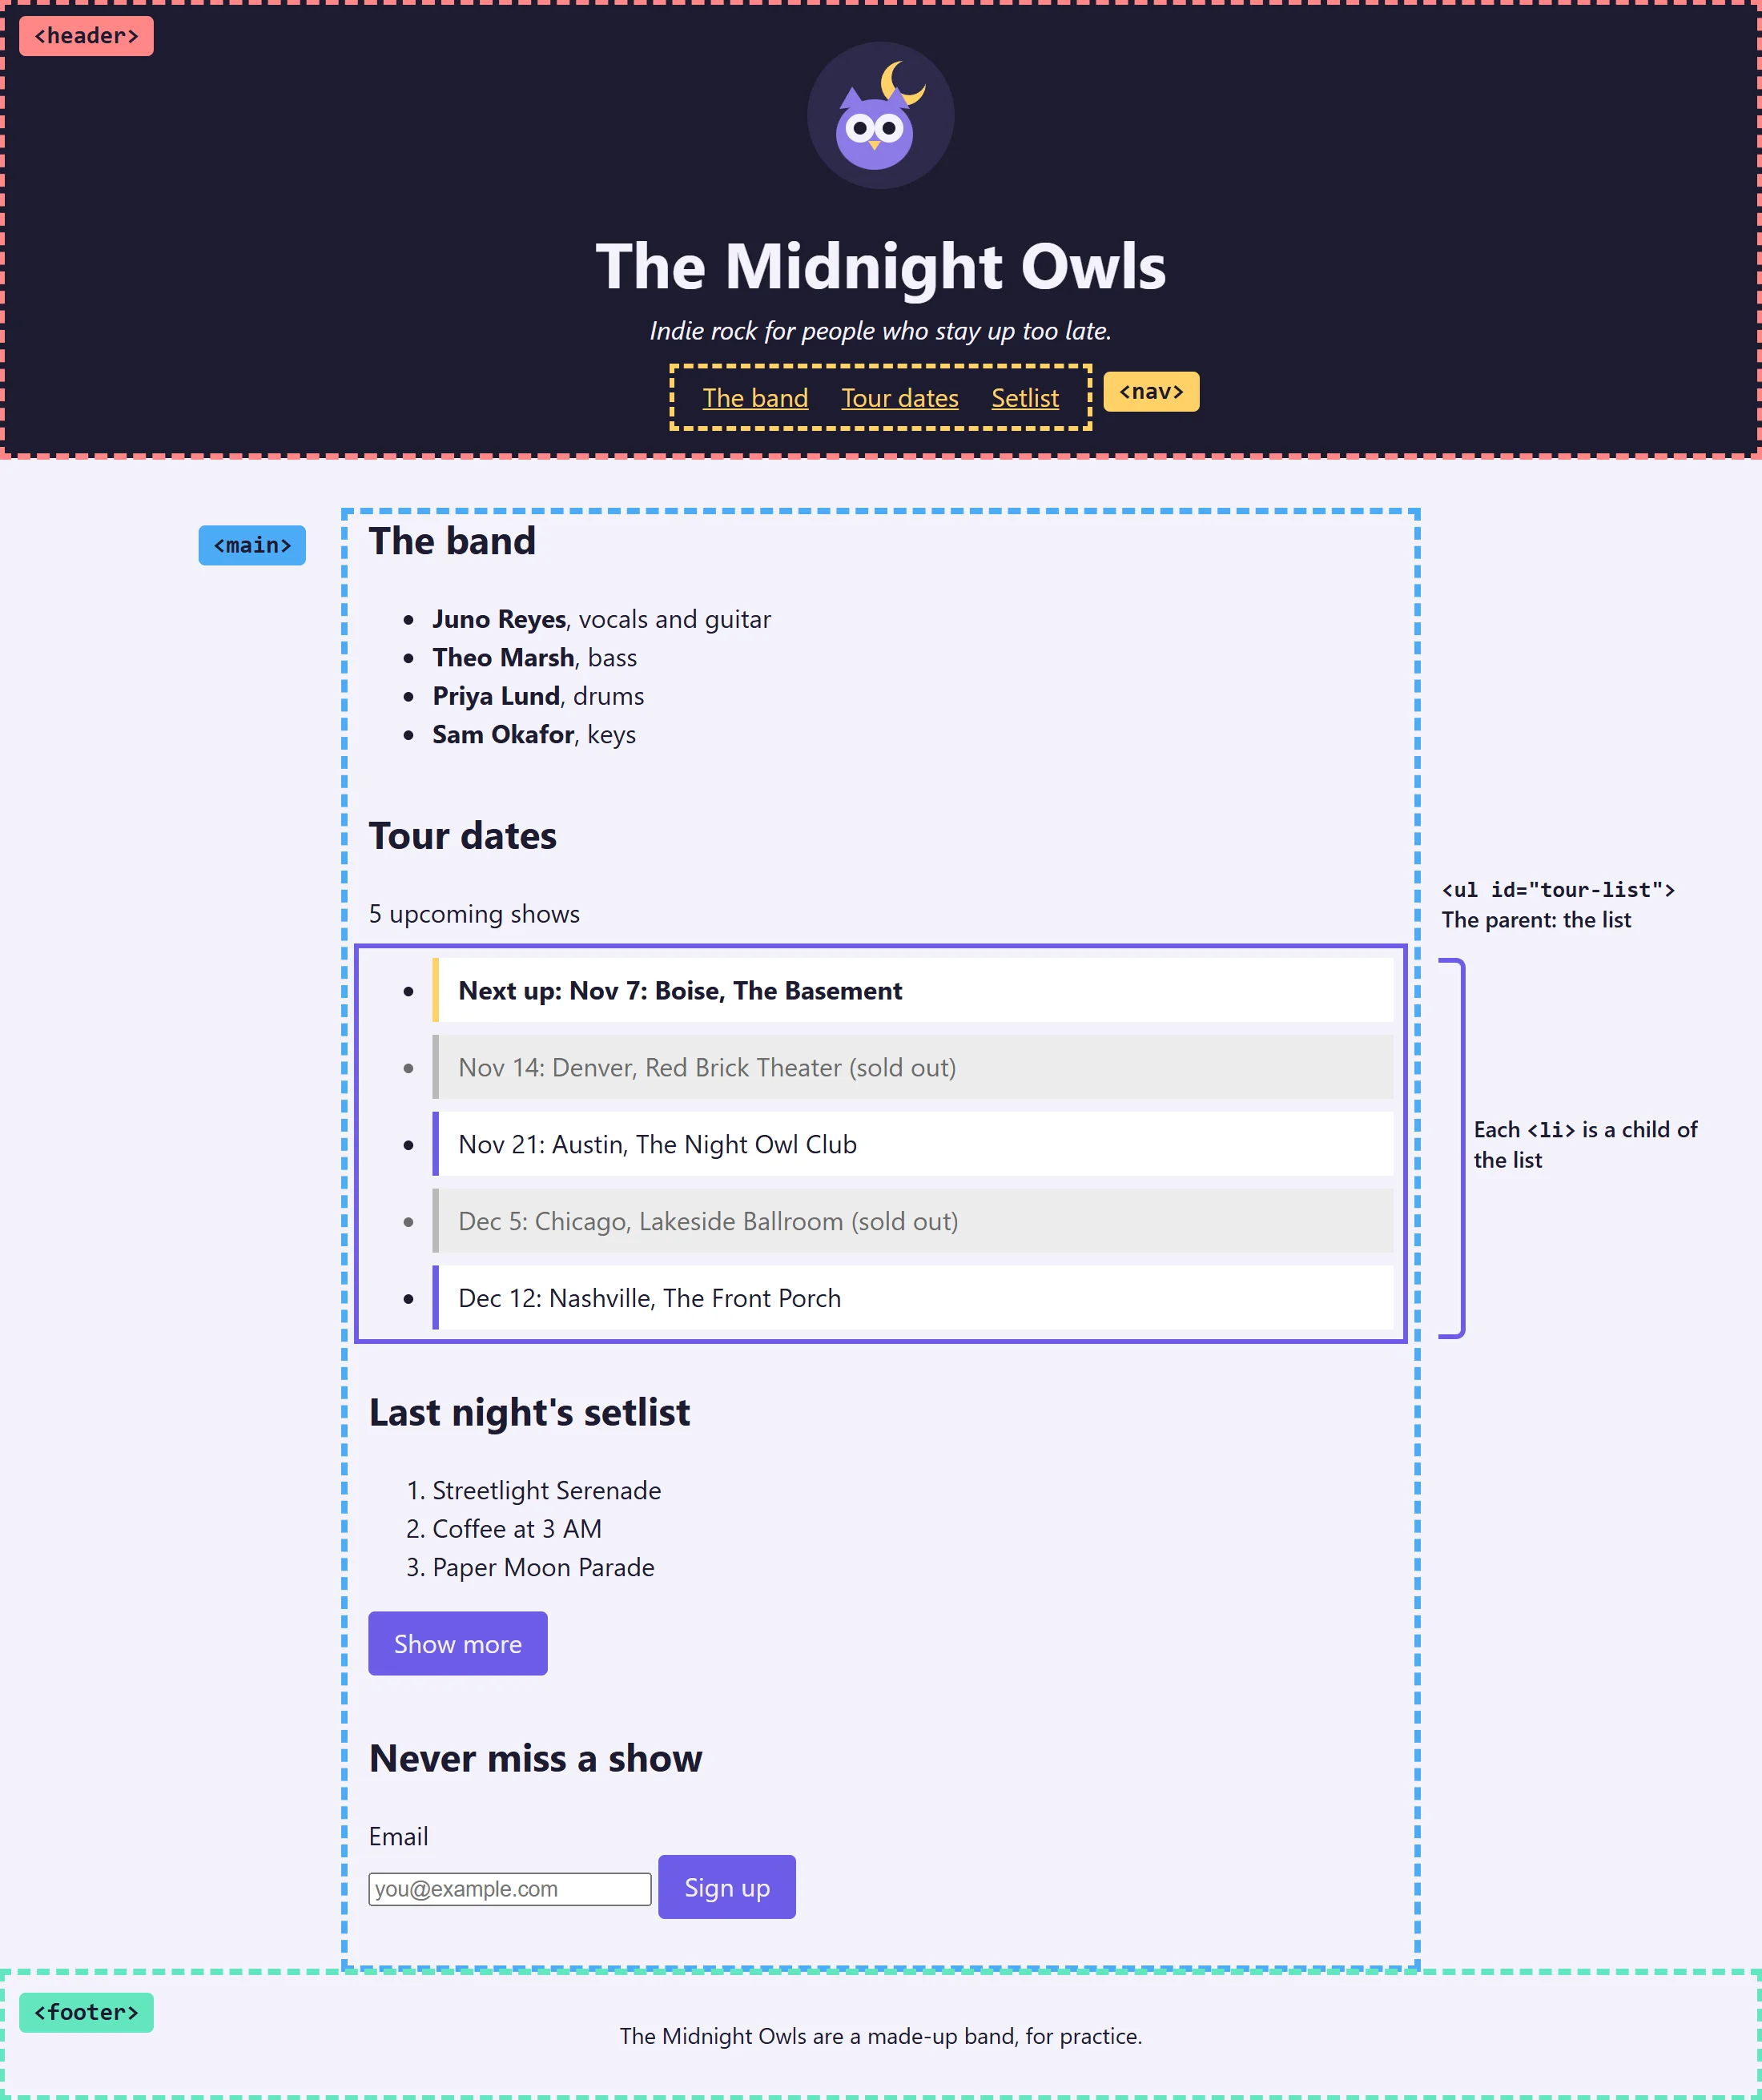
id and class: names your JavaScript can find
At a concert, your ticket has a seat number, Row F, Seat 12: one seat, for one person, and nobody else in the building has it. You might also get a wristband, and everybody with a gold wristband can go backstage. HTML has both kinds of name:
<ul id="tour-list">
  <li class="show">Nov 7: Boise, The Basement</li>
  <li class="show sold-out">Nov 14: Denver, Red Brick Theater (sold out)</li>
</ul>
idis the seat number. It names one element, and no other element on the page may have the same id. Here,tour-listis the tour list.classis the wristband. Many elements can share it: both shows have the classshow. One element can also wear several classes, separated by spaces: the Denver show has two,showandsold-out.
How to choose: when your code needs to find one particular element, the tour list, the show count, the Show more button, give it an id. When several elements share a job or a look (every show, every band member, every sold-out show), give them a class. And a look you'll want to switch on and off, like sold out or hidden, is a class too: the next lesson shows why.
Write the names in lowercase, with hyphens between words, as in tour-list and sold-out. In the HTML, an attribute holds the name alone: class="sold-out", never class=".sold-out". The dot and the # you'll see in the next lesson belong to CSS, not to HTML.
The whole page
Every page has the same wrapping around its content. Here is a short version of the fan page, with all of it:
<!DOCTYPE html>
<html lang="en">
<head>
  <meta charset="utf-8">
  <title>The Midnight Owls</title>
  <link rel="stylesheet" href="styles.css">
</head>
<body>
  <h1>The Midnight Owls</h1>
  <section id="tour">
    <h2>Tour dates</h2>
    <p id="show-count">2 upcoming shows</p>
    <ul id="tour-list">
      <li class="show">Nov 7: Boise, The Basement</li>
      <li class="show sold-out">Nov 14: Denver, Red Brick Theater (sold out)</li>
    </ul>
  </section>
  <script type="module" src="fan-page.js"></script>
</body>
</html>
<!DOCTYPE html>tells the browser it's a modern web page, and<html lang="en">holds everything else and says the page is in English.- The
<head>holds information about the page, which isn't shown on it: the characters it uses (<meta charset="utf-8">), the title in the browser tab, and the<link>that loads the page's stylesheet, the CSS file that sets its look. - The
<body>holds everything you see. The<script>element at the end of it loads the page's JavaScript, as in JavaScript on a Web Page.
Try it. Make a folder named midnight-owls, and in it a file named index.html with the page above (the stylesheet and the script don't exist yet, and that's fine: the page shows without them). Open it with Live Preview in your browser (Live Preview: Show Preview (External Browser) from the Command Palette). Right-click Nov 7: Boise and choose Inspect. The Elements panel shows the page's nesting: click the small arrows to fold the <ul> closed and open it again, and find the id and class attributes on each line.
Check yourself
2 questions to try on the lesson page.
So what
Every page JavaScript touches is a set of boxes inside boxes, with an id on the ones that are one of a kind and a class on the ones that come in groups. Read a page that way, and you know where your code has to look.